How to Install Under Eave Lighting: Step-by-Step Installation Methods, Best Practices & Troubleshooting for Contractors
Under eave lighting mounts fixtures to the horizontal soffit surface beneath roof overhangs, directing light downward onto walls, walkways, and ground areas. The installation method — and the skill required — varies significantly depending on fixture type, power system, and soffit material. This guide covers all three common approaches: hardwired line-voltage flood lights, low-voltage LED systems, and permanent eave-mounted LED strip lighting, along with the code requirements, soffit-specific challenges, and troubleshooting fixes that trip up contractors most often.
Choosing the Right Under Eave Lighting System Before You Install
The first decision shapes everything else. Under eave lights fall into two electrical categories, and confusing them creates code problems that are expensive to fix after the fact.
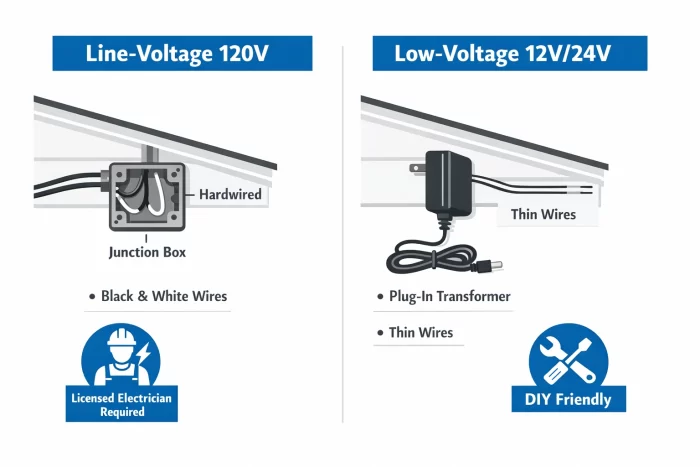
Line-Voltage vs Low-Voltage Under Eave Lighting Installation
Line-voltage systems (120V) include hardwired under eave flood lights, under eave motion sensor lights, and under eave security lights. These connect directly to household wiring, require a licensed electrician in most jurisdictions for new circuits, and must be installed in weatherproof junction boxes. Fixtures must be rated for damp locations at minimum — wet-location rated if they’re exposed to direct rain past the overhang. Under NEC Article 410, surface-mounted boxes for all exterior fixtures must be raintight.
Low-voltage systems (12V/24V) cover the majority of permanent under eave LED lighting, under eave LED strip lighting, and decorative outdoor lighting under eaves. For contractors specifying a finished fixture rather than a DIY strip kit, see our [IP68 RGBCW LED eaves light product](https://www.shinesall.com/led-eaves-light-ip68-waterproof-rgbcw-factory-direct-sale).These run from a plug-in transformer and don’t require a permit for fixture installation — though you’ll still need one if you’re adding a new GFCI outlet or converting a switch. Under NEC Article 411, low-voltage lighting power supplies must be Class 2 compliant. For 12V DC drivers, that means 60W maximum; 24V DC drivers top out at 96W.
A quick rule of thumb for contractors: if a homeowner wants to control the lights from a wall switch or integrate them into a smart home system, plan for line-voltage or a low-voltage transformer with a compatible smart controller — not a basic plug-in transformer.
Fixture Types and Where Each Works Best
Recessed soffit lights (can lights): The cleanest look for outdoor under eave lighting. Require cutting holes in the soffit panel, running wire through the cavity, and using IC-rated fixtures if there’s insulation contact above. Code consultant Glenn Mathewson notes that non-IC-rated cans need a ½-inch clearance to combustibles and a 3-inch clearance to insulation — something worth checking before you cut.
Under eave flood lights / under eave LED flood lights: Surface-mounted, typically line-voltage. Straightforward swap if an existing junction box is present. Eave-mount orientation requires rotating the sensor and heads — not all flood fixtures support this, so verify before quoting the job.
Under eave LED strip lighting: Low-voltage, adhesive or clip-mounted along the soffit edge. Best for architectural accent and color-changing applications. Requires mounting channels for weatherproofing and long-term adhesion.
Under eave motion sensor light (eave-mount): Most dual-head motion flood lights can mount to an eave with the canopy flush against the soffit. The PIR sensor sits above the light heads, heads face downward. Check IP rating — IP65 rated fixtures can ignore “this side up” markings, which simplifies eave orientation.
Planning the Layout: Spacing, Coverage, and Soffit Assessment
Bad spacing is the most visible installation mistake and one of the hardest to fix without redoing the run. Get the layout right before drilling anything.
Spacing Guidelines for Under Eave Lights
For standard residential eaves at 8–10 feet height, space fixtures 6–8 feet on center. The overlap between adjacent fixtures eliminates dark gaps without creating harsh hot spots. Start measurements from corners, placing the first fixture 3–4 feet from each corner — half the standard interval. 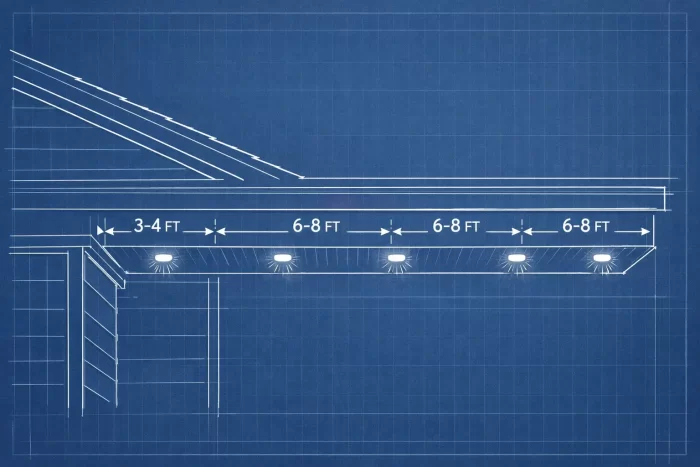
Under Eave Lighting Spacing Layout for 8–10 Foot Eaves
This prevents the dark pooling at corners that undermines the whole look of outdoor under eave lighting.
Mark window and door locations on your eave layout diagram. Place fixtures between windows rather than directly above them. An under eave LED flood light reflected in a window at night creates an unintended mirror effect that reduces curb appeal and annoys the homeowner.
At roof valleys, dormers, and angle changes, install a fixture on both sides of the transition point, even if it falls within the normal spacing interval.
Soffit Material Assessment — the Step Most Installers Skip
Soffit material determines your mounting method before anything else.
Vinyl and aluminum soffits flex under point loads. Driving screws directly into thin sheet vinyl without backing support causes fixtures to sag within a few months. The fix: use backing boards or manufacturer-supplied mounting brackets that distribute weight across a larger footprint. Never rely solely on screws driven into unsupported sheet goods.

How to Prevent Sagging Vinyl Soffit When Installing Under Eave Lights
Wood soffits are the most forgiving. Use a stud finder to locate joists and mount directly to structural members where possible. For spans between joists, a backing plate spreads the load adequately.
Stucco or masonry soffits require masonry anchors and a hammer drill. Pre-drill pilot holes to avoid cracking.
Clean the mounting surface with a damp cloth before installing any clip-mounted or adhesive-backed fixture. Dust, pollen, and cobwebs prevent proper adhesion. On painted soffits older than five years, lightly sand the mounting area to expose fresh paint.
Power Load Calculation
Calculate total fixture wattage before purchasing a transformer or verifying circuit capacity. Twenty fixtures at 5 watts each draw 100 watts total — about the same as a single old-school incandescent bulb. Add 20% overhead when sizing transformers: a 20-fixture, 100W load needs at least a 120W transformer to avoid running it at continuous maximum capacity, which shortens its lifespan. For LED strip lighting, low-voltage runs are typically limited to 150–200 feet per transformer depending on wire gauge.
Step-by-Step: How to Install Under Eave Flood Lights (Line-Voltage, Hardwired)
This method applies to hardwired under eave flood lights, under eave security lights, and under eave motion sensor light installations replacing an existing junction box.
What you’ll need: Drill and bits, voltage tester, screwdriver, wire strippers, wire connectors, weatherproof junction box (if not present), ladder.
Step 1: Kill the Power and Verify
Turn off the circuit at the breaker panel. Return to the fixture location and test with a non-contact voltage tester before touching any wires. This is not optional. Verify twice — once at the breaker, once at the box.
Step 2: Remove the Existing Fixture
Unscrew the fixture canopy or cover. Carefully separate the wire connectors and note which wire connects where. Standard color coding: black to black (hot), white to white (neutral), green or bare copper to ground.
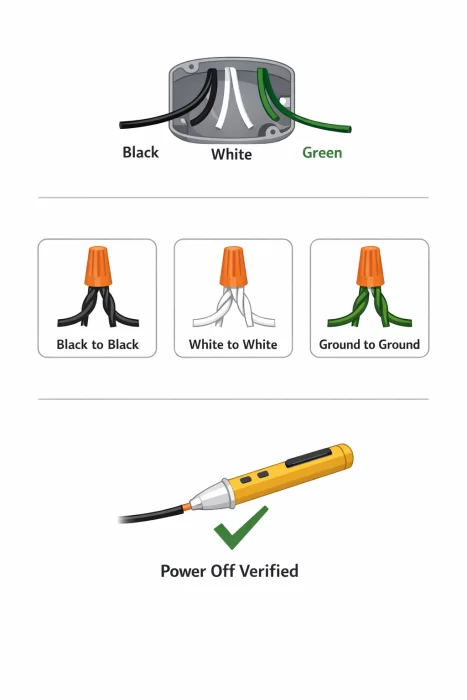
Hardwired Under Eave Light Wiring: Black to Black, White to White, Ground to Ground
If the existing wiring is aluminum or shows any discoloration or melting, stop and consult an electrician before continuing.
Step 3: Mount the Junction Box (If Adding New)
For eave mounting without an existing box, you’ll need attic access or the ability to fish wire through the soffit cavity. Running a flexible drill bit up through the soffit into the attic cavity, then pulling wire down to the new location, is the standard contractor approach. Secure the new weatherproof junction box to structural backing — not just the soffit panel.
Step 4: Install the New Fixture
For eave-mount flood lights, orient the canopy flush against the soffit surface. Most eave-compatible fixtures have the PIR sensor sitting above the light heads with heads pointing downward. Align the mounting holes, drill pilot holes to prevent wood splitting, and secure with the provided screws. Do not overtighten on vinyl soffits.
Step 5: Wire the Connections
Match and connect: black to black, white to white, ground to ground. Twist wires together and cap with wire connectors. Give each connection a firm tug to confirm it’s secure. Tuck all connections neatly into the junction box.
Step 6: Restore Power and Test
Turn the breaker back on. Test the light. For motion sensor lights, most have a “test mode” that shortens the delay to a few seconds — use this to verify detection range and head orientation before finalizing. Adjust the sensitivity dial, time delay, and detection zone before closing up.
Step-by-Step: How to Install Permanent Under Eave LED Lighting (Low-Voltage)
This covers permanent under eave lighting systems using LED strips or low-profile LED puck fixtures on a 12V or 24V transformer.
Step 1: Map the Run and Calculate Load
Measure the total linear footage of eaves to be lit. Calculate total wattage (strip wattage per foot × total feet, or puck wattage × fixture count). Size the transformer with 20% overhead. Identify the transformer location — it needs to be near an existing outdoor GFCI outlet or one you’re adding.
Step 2: Mount the LED Strip Channel or Fixtures
For under eave LED strip lighting, mount aluminum channels to the soffit before inserting the strip. Channels protect the adhesive backing from UV degradation, improve heat dissipation, and give the installation a finished appearance. Secure channels with screws into structural backing at 12-inch intervals.
For puck or disc-type under eave mounted lights, mark positions at the planned spacing, drill pilot holes, and fasten with provided screws.
Step 3: Run the Low-Voltage Wire
Route wire along the soffit, securing with cable staples or clips at 12–18 inch intervals. Keep low-voltage wire separated from any 120V circuits — they can share a chase but not a conduit, per NEC requirements. If routing wire through a wall to reach the transformer, use conduit for that transition.
Leave several extra feet of wire at each fixture end. It’s far easier to trim excess wire than to splice in more mid-run.
Step 4: Connect Fixtures to Wire
Most low-voltage under eave LED systems use push-in or twist-lock connectors. Match polarity: positive to positive, negative to negative. Poor polarity connections on LED strips cause the strip to fail entirely or run at reduced output — a common callback issue.
Step 5: Connect to Transformer and Test
Connect the wire run to the transformer output terminals. Plug the transformer into the GFCI outlet. Power on and verify all fixtures illuminate. Walk the full run looking for dark sections, which indicate a loose connector or a damaged strip segment.
How to Install Lights Under Eaves for Seasonal Use: Christmas Lights and String Lights
Installing holiday string lights under eaves is a separate workflow from permanent outdoor under eave lighting — the goal is clean, repeatable attachment without damaging the soffit or fascia.
How to Attach Christmas Lights to Eaves
Plastic gutter clips and all-in-one shingle tabs are the standard attachment method. Gutter clips hook over the gutter lip and hold the light cord flat against the fascia edge. Shingle tabs slide under the first course of shingles to hang lights along the roofline. Neither method requires drilling, and both release cleanly at the end of the season.
For lights hung directly on the soffit face, adhesive-backed light clips rated for outdoor use work on vinyl and aluminum without leaving marks. Test adhesion on an inconspicuous section first — some vinyl formulations reject adhesive in cold temperatures.
How to Hang String Lights on Eaves
String lights are heavier than standard Christmas light strands and need more support. Space attachment points every 2–3 feet to prevent sagging. Screw-in cup hooks at the fascia or soffit edge work well for semi-permanent string light runs. For a fully removable installation, tension wire or cable suspended between two anchor points gives string lights a clean hang without contact with the soffit surface.
How to Measure Eaves for Christmas Lights
Measure the perimeter of the roofline where lights will hang, adding 10–15% for sag allowance and corner wraps. For a single-story home with a 140-foot perimeter, plan for approximately 155–160 feet of light strand. Subtract any sections over garage doors or entry areas where you plan a different treatment.
Code Compliance and Permit Requirements for Under Eave Security Lights Installation
Under eave lighting sits in a compliance gray zone that catches contractors off guard. Here’s the practical breakdown.
Fixture ratings: Fixtures under protected eaves are considered “damp locations” under NEC 410. Use fixtures listed for damp location minimum. Fully exposed fixtures — where rain hits directly — require wet-location rated products. Surface-mounted junction boxes must be raintight.
Permits: Low-voltage systems (12V/24V) with plug-in transformers generally don’t require an electrical permit for fixture installation. Adding a new GFCI outlet to power the transformer does require a permit. Line-voltage (120V) work — new circuits, new junction boxes, or converting switches — requires a licensed electrician and permit in most jurisdictions.
IC rating for recessed installs: When installing can lights in soffits where insulation may be above, IC-rated fixtures are strongly recommended. Non-IC cans require a half-inch clearance to combustibles and a 3-inch clearance to insulation — difficult to guarantee in tight soffit cavities.
GFCI requirements: Standard exterior light fixtures don’t require GFCI protection under NEC unless installed near a pool or spa. However, any new outdoor receptacle added to power a lighting transformer must be GFCI protected.
Troubleshooting Common Under Eave Lighting Problems
Even well-planned installations run into issues. These are the failures that generate the most callbacks.
Flood light works on the wall but not on the eave mount. The dusk-to-dawn photocell is blocked by the overhang. The sensor reads “daytime” because it’s facing up under a shaded soffit.
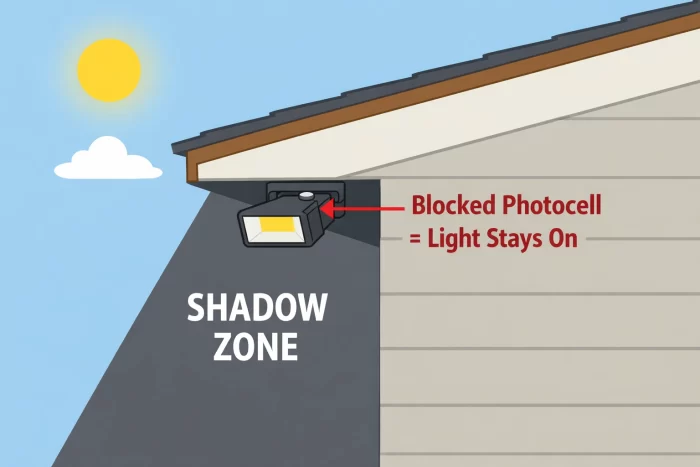
Why an Under Eave Flood Light Stays On: Blocked Photocell Under the Soffit
Reorient the sensor to face outward and downward, or select a fixture with a separate remote photocell.
Motion sensor triggers constantly or not at all. PIR sensors detect changes in infrared heat across detection zones. Under eaves, HVAC vents, dryer exhausts, and heat radiating from attic vents create false triggers. Reduce sensitivity and narrow the detection angle. For complete non-response, verify the sensor isn’t in permanent-off mode from a power interruption — most motion lights reset to factory settings after any power loss. The fix is usually switching the breaker off-on-off-on within two seconds to re-enter test mode.
LED strip lights have dark sections. This almost always points to a voltage drop problem, not a failed LED. Long runs at 12V lose voltage over distance. Calculate voltage drop before installation — runs over 16 feet at 12V typically need 24V systems or wire gauge upgrades to maintain consistent brightness from start to finish.
Fixtures sag or pull away from vinyl soffit. Installed without backing support. The repair requires either removing the fixture and adding a backing board behind the soffit panel, or replacing with a fixture that uses a wider mounting plate. Do not re-drive screws into the original stripped holes.
Under eave LED strip lighting peels after one season. UV degradation destroyed the adhesive backing. Aluminum mounting channels with mechanical clips replace adhesive as the primary retention method and extend strip life significantly in direct outdoor exposure.
Frequently Asked Questions
Do I need an electrician to install under eave lighting?
Low-voltage systems (12V/24V) with plug-in transformers generally don’t require an electrician for the fixture installation itself. Line-voltage (120V) installations — new circuits, new junction boxes, or any modifications to household wiring — require a licensed electrician and a permit in most jurisdictions. If in doubt, check with your local authority having jurisdiction (AHJ) before starting work.
What IP rating do I need for outdoor under eave lights?
Fixtures installed under eaves are classified as damp locations under NEC standards — IP44 is the minimum acceptable rating. For any fixture that could be hit by wind-driven rain or is near a drip edge, IP65 is the better choice. IP65 fixtures are fully sealed against dust and protected against low-pressure water jets from any direction.
How far apart should under eave lights be spaced?
For standard 8–10 foot eave heights, space fixtures 6–8 feet on center. Place the first fixture 3–4 feet from each outside corner. Adjust spacing tighter (4–6 feet) for lower eaves or when a brighter, more even wash is needed. Mark window positions and center fixtures between them to avoid reflected glare through glass.
Can any flood light be eave mounted?
Not all flood lights support eave installation. The light heads must be capable of rotating to point downward when the fixture is mounted horizontally. IP65-rated fixtures can generally ignore “this side up” markings, which makes eave mounting easier. Always check the manufacturer’s installation guide or FAQ before purchasing — many brands publish specific eave-mount installation videos that clarify the orientation.
Running under eave lights from an attic access makes wiring dramatically easier — you can lay out the full run, drop wire precisely to each fixture location, and avoid fishing through blind cavities. On retrofit jobs without attic access, ½-inch flexible PVC conduit threaded through the soffit cavity is the practical workaround. Either way, leave extra wire at each junction — pulling fixtures back out to re-splice mid-run is the kind of return trip that costs more than the job paid.
Key Takeaways
- Match fixture type and IP rating to the NEC location classification: damp-location rated under protected eaves, wet-location rated where exposure is direct.
- Assess soffit material before drilling — vinyl and aluminum require backing boards to prevent sag.
- Size transformers at 120% of total load for low-voltage systems; calculate voltage drop on runs over 16 feet at 12V.
- Line-voltage (120V) work requires a permit; low-voltage transformer installations typically do not, but adding new outlets does.
- Start fixture spacing from corners and work toward center to avoid uneven distribution.