Where to Place Outdoor Eaves Lights for Optimal Lighting?
Optimal Eaves Lights placement depends on combining three factors: spacing lights 6-8 feet apart for even coverage, positioning them strategically at key locations like entrances and corners, and balancing brightness levels to avoid the “floating house” effect. The exact placement varies based on your home’s architecture, ceiling height, and whether you prioritize security, ambiance, or highlighting features.
Understanding Eaves Lights Placement Fundamentals
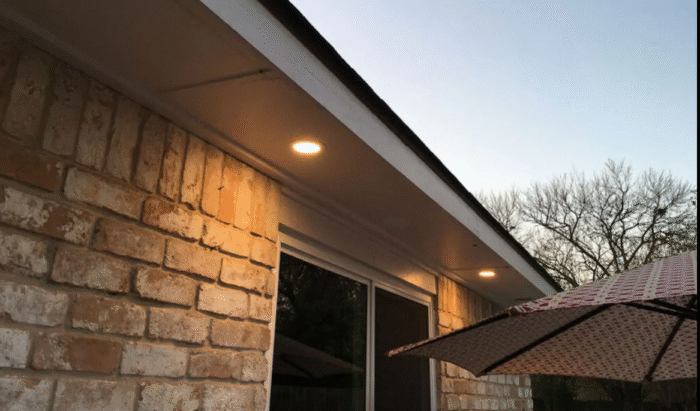
Eave lights serve different purposes depending on where you mount them under your roof overhangs. These recessed or surface-mounted fixtures illuminate downward and outward, casting light onto walls, pathways, and outdoor living areas. The placement determines whether your lights enhance security, create welcoming ambiance, or accomplish both.
The distance between your eaves and the ground directly impacts light distribution. Standard single-story homes with eaves 9-10 feet from the ground require different spacing than two-story homes where eaves sit 15-18 feet high. Taller installations need narrower beam angles and potentially closer spacing to adequately illuminate ground-level areas.

Strategic Eaves Lights Spacing Guidelines
Standard Spacing Formula
Place eave lights 6 to 8 feet apart for most residential applications. This spacing provides uniform illumination without creating dark patches or excessive brightness. The 8-foot guideline works well for standard ceiling heights around 8-9 feet, while 6-foot spacing suits higher eaves or areas requiring brighter coverage.
Calculate your total number of lights by measuring your eave length and dividing by your chosen spacing interval. For a 32-foot front eave, you’d need 4-5 lights at 8-foot spacing. Always position the first and last lights at approximately half your spacing distance from corners—this prevents dark edges while maintaining symmetry.
Adjusting for Ceiling Height
Higher eaves demand different considerations. The general rule divides ceiling height by two to determine spacing. For 10-foot eaves, aim for 5-foot intervals; for 12-foot eaves, use 6-foot spacing. This compensates for light spread—higher mounting positions create wider beam patterns but reduced ground-level intensity.
Beam angle matters significantly for taller installations. Wide flood patterns (60-90 degrees) work efficiently for standard heights, while narrow spots (30-40 degrees) better serve elevated mounting positions by projecting light farther downward.
Priority Locations for Eave Lights
Main Entrances and Doorways
Your front entrance deserves concentrated illumination. Position one eave light directly above or slightly offset from the door—centered placement between 2-3 feet from the door frame works best. This creates a welcoming glow while ensuring visitors can clearly see entry features like door handles, house numbers, and steps.
Complement door lighting with flanking lights on either side if your entryway spans more than 8 feet. This eliminates harsh shadows that single-light placement creates. For covered porches, space lights every 6 feet along the porch length to maintain consistent illumination from the street to the door.
Corner Positioning Strategy
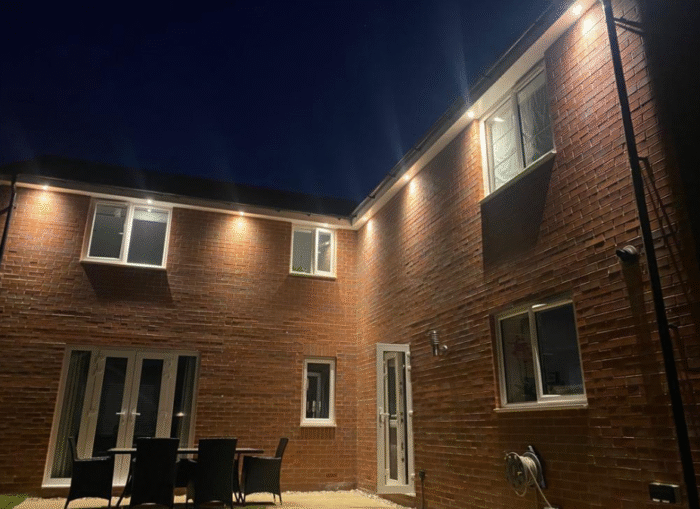
Corners represent critical eave light locations for two reasons: security and architectural emphasis. Place lights 3-4 feet from each corner to illuminate side walls and eliminate hiding spots that criminals favor. This positioning also prevents the “floating house” effect where roofline lighting appears disconnected from the structure.
Avoid placing lights exactly at corners—this creates awkward beam patterns that waste light into empty space rather than illuminating useful areas. The 3-4 foot offset directs light along walls while still reaching corner zones.
Pathways and Walkways
Install eave lights above any paths leading to entrances. Space these at 8-foot intervals along the eave section that parallels your walkway. The downward illumination reduces trip hazards by clearly defining path edges, steps, and elevation changes.
Consider the path width when positioning lights. Narrow 3-foot walkways need lights centered above the path, while wider 6-foot paths benefit from staggered or paired lights that eliminate center shadows.
Garage and Driveway Areas
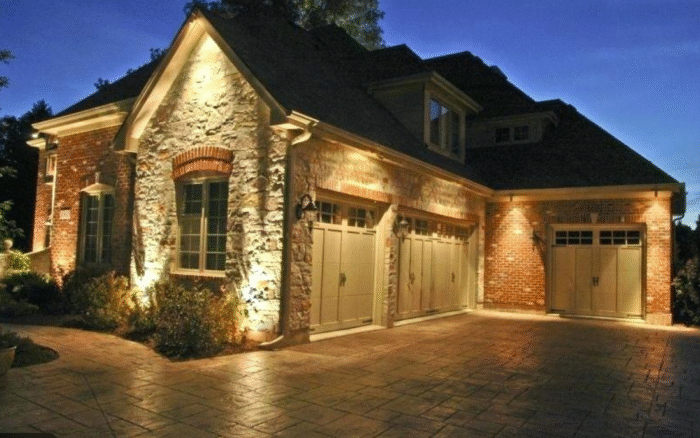
Garage eaves require task-oriented lighting placement. For double-wide garage doors (16 feet), position lights at the outer edges (approximately 2-3 feet from each end) plus one centered light. This three-light configuration illuminates the entire garage face and driveway approach zone.
Single garage doors need just two strategically placed lights—one on each side about 2-3 feet from the door edges. This setup provides even coverage for parking, unloading, and nighttime security without creating harsh center shadows.
Outdoor Living Spaces
Patio and deck eave lights demand different spacing considerations focused on ambiance rather than security. Space lights every 10-12 feet for softer, mood-oriented illumination in entertainment areas. This wider spacing creates gentle pools of light rather than bright, security-focused coverage.
Position these lights to illuminate seating areas, dining zones, and cooking spaces without creating glare at eye level. If your outdoor kitchen sits under eaves, place lights 4-6 feet apart directly over food prep and grill areas for functional task lighting.
Balancing Multiple Eaves Lights Functions
Combining Security and Ambiance
Many homeowners need eave lights to serve dual purposes. Achieve this by varying brightness levels between security and entertainment zones. Install brighter 800-1000 lumen fixtures at corners, entrances, and garage areas, while using dimmer 400-600 lumen lights for patio and living spaces.
Adjustable or dimmable LED eave lights offer maximum flexibility. Set them to bright security mode when away from home, then dim them 40-60% for comfortable evening ambiance when entertaining outdoors.
Avoiding Common Placement Mistakes
The “alien spaceship effect” occurs when too many bright eave lights line the roofline without complementary ground-level lighting. This makes homes appear to float in darkness. Prevent this by limiting eave lights to necessary locations rather than continuous roofline coverage, and add uplighting or landscape lights at ground level to anchor the structure visually.
Excessive brightness creates another frequent problem. Soffit lights shouldn’t replicate stadium lighting—they should provide subtle, functional illumination. Choose 600-800 lumen output for general applications rather than maximum-brightness fixtures that create harsh glare and uncomfortable viewing conditions.
Technical Placement Considerations
Avoiding Structural Obstacles
Mark joist locations before finalizing light positions. Ceiling joists typically run perpendicular to the house wall at 16 or 24-inch intervals. Recessed eave lights require installation between joists, which may force slight spacing adjustments from your calculated intervals.
Check for HVAC venting, soffit vents, and other penetrations that limit usable mounting space. Most soffit vents require 6-12 inches of clearance—position lights accordingly to maintain proper ventilation and avoid code violations.
Electrical Access and Wiring Runs
Plan eave light placement around existing electrical access points. Starting from an outdoor outlet or interior wall switch minimizes installation complexity. Each additional light position further from power sources increases wiring difficulty and installation costs.
For extensive eave lighting projects covering multiple home sides, establish a main power source in a central location like a garage corner. This allows wire runs to extend in both directions, reducing total wire length and voltage drop concerns.
Motion Sensor Integration
When combining eave lights with motion sensors, position sensors at corner locations covering the widest possible detection zones. Most residential sensors offer 180-degree detection patterns spanning 50-70 feet—perfect for monitoring front yards, driveways, and side yards from strategic corner placements.
Avoid positioning motion sensors where trees, bushes, or frequent animal traffic causes false triggers. Angle adjustable sensors downward toward walking paths rather than across open yards where wind-blown vegetation activates them unnecessarily.
Customizing Placement for Home Architecture
Single-Story Ranch Homes
Ranch-style homes with consistent 8-9 foot eaves around the entire perimeter benefit from uniform 8-foot spacing. Focus concentrated lighting (6-foot spacing) at the front entrance and garage, then switch to wider 10-foot spacing along side and rear eaves where security needs decrease.
Two-Story and Multi-Level Homes
Higher eaves on two-story sections require adjusted strategies. Upper-level eaves at 18-20 feet create much wider light spread patterns. Space these lights 10-12 feet apart since the increased height naturally provides broader coverage. Supplement with ground-level or first-floor eave lights in areas requiring more focused illumination.
L-Shaped and Complex Layouts
Homes with multiple roof levels and directional changes need careful planning at transition points. Where perpendicular eave sections meet, position lights 4-5 feet from inside corners on both sides. This eliminates the dark zone that single-light placement creates at L-intersections.
Testing and Adjusting Your Eaves Lights Layout
Before permanent installation, temporarily position lights using extension cords or battery-powered alternatives. Walk your property after dark to identify dark spots, overly bright zones, or spacing issues. This test-and-adjust approach prevents costly mistakes and ensures optimal coverage.
Take photos from the street and various viewing angles. What appears well-lit from your doorway may show gaps or excessive brightness from the curb. Adjust positions based on these real-world observations rather than paper calculations alone.
Color Temperature and Beam Angle Selection
Warm white (2700-3000K) eave lights create inviting ambiance suitable for entertainment areas and entrances. Cooler temperatures (4000-5000K) provide crisper illumination better suited for security applications and task lighting over garage areas.
Match beam angles to mounting height and intended coverage areas. Standard 8-10 foot eaves work well with 60-degree flood patterns. Heights above 12 feet benefit from 40-degree spots that concentrate light downward rather than spreading it horizontally where it’s less useful.
Maintenance Access Considerations
Position eave lights where you can safely access them for bulb changes and cleaning. Avoid placing lights over sloped roofs, thorny landscaping, or other obstacles that complicate ladder placement. Areas requiring extension ladders or roof access for maintenance should use longer-lasting LED fixtures to minimize service frequency.
Plan your layout to group lights in accessible zones. Clustering three lights in an easy-to-reach location beats spreading them across difficult access points, even if perfect mathematical spacing suffers slightly.
Integration with Smart Home Systems
Modern eave light placement should account for smart control capabilities. Group lights by function and location—front entrance lights on one circuit, garage and driveway lights on another, patio lights independently controlled. This allows scheduling different zones for varying on/off times, brightness levels, and automation rules.
Position motion-activated eave lights at transition zones where automated lighting makes most sense: garage approaches, side yard access points, and service areas. Save always-on or manually controlled lights for main entertaining and entrance zones where unexpected motion-triggered brightness creates poor ambiance.
FAQ
How many eave lights do I need for my home?
Count the total linear feet of eaves you want to illuminate and divide by 6-8 feet, depending on your brightness preferences and ceiling height. A typical 40-foot front section needs 5-7 lights. Add concentrated lighting at entrances and corners, then space remaining lights evenly between these priority positions.
Can I install eave lights myself or should I hire an electrician?
DIY installation works well if you have existing outdoor electrical access and basic wiring knowledge. Most projects require running new circuits through attic spaces to multiple fixture locations—this electrical work typically requires licensed electrician expertise for safety and code compliance. Surface-mount fixtures with plug-in transformers offer easier self-installation options than recessed fixtures requiring ceiling penetrations.
Should eave lights stay on all night or use motion sensors?
Combine both approaches for optimal results. Use always-on (or dusk-to-dawn) lighting at main entrances and gathering spaces for consistent visibility and ambiance. Add motion-activated lights at secondary access points, side yards, and garage areas where constant illumination isn’t necessary but on-demand security lighting provides value.
What’s the ideal brightness for outdoor eave lights?
Choose 600-800 lumens for general ambient lighting and entertaining areas. Increase to 800-1000 lumens for security-focused locations like corners, garages, and isolated entry points. Avoid exceeding 1200 lumens per fixture unless illuminating very large spaces or compensating for extremely high mounting positions—excessive brightness creates uncomfortable glare and the harsh “floating house” appearance.
Key Takeaways
- Space eave lights 6-8 feet apart for uniform coverage, adjusting closer for higher mounting positions or security zones
- Prioritize entrance lighting, corner positions, and pathway illumination before filling remaining eave sections
- Balance roofline lighting with ground-level fixtures to prevent the “floating house” effect
- Test your layout with temporary positioning before final installation
- Choose 600-800 lumens for ambiance and 800-1000 lumens for security applications
- Plan electrical access points early in your design to minimize installation complexity