Professional Eave Lighting Installation Guide: Strategies for Contractors and Wholesale Suppliers
Under eave lighting installation involves mounting LED fixtures to the underside of roof overhangs. Then, it requires routing low-voltage or line-voltage wiring to a transformer or circuit breaker. For contractors and wholesale suppliers, the execution details — including fixture IP ratings, structural mounting points, spacing calculations, and code compliance — play a pivotal role in determining whether a job runs smoothly at scale or, alternatively, turns into a callback. In this guide, we will cover the full process, starting from site assessment and progressing all the way through to wiring and commissioning. Additionally, contractor-specific sourcing notes are included throughout the text, providing valuable insights for more efficient planning and execution. Ultimately, this process of under eave lighting installation is crucial for achieving consistent results.
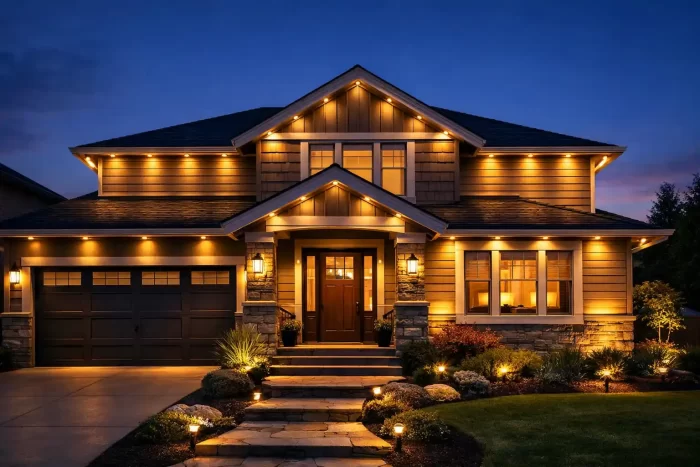
Stunning Under Eave Lighting Installation Result
How to Choose the Right Fixtures Before Installing Eave Lights
Choosing the right fixtures is a critical decision, as it shapes every downstream step in the outdoor lighting installation under eaves. Specifically, three variables matter most at the commercial and contractor level: ingress protection rating, lumen output, and voltage architecture.
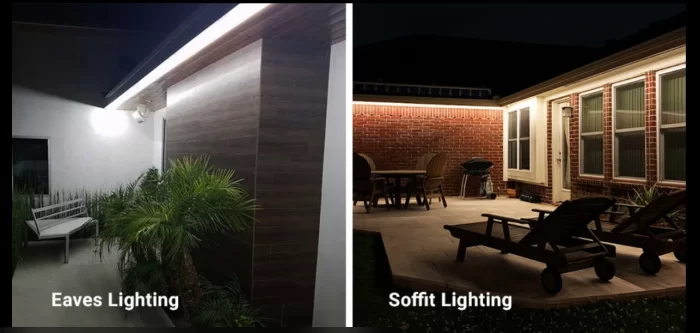
Eaves Lighting vs Soffit Lighting Comparison
IP Ratings for Outdoor Eave Lighting
The NEC clearly distinguishes between damp and wet locations. Fixtures installed under eave lighting positions — sheltered by the roof overhang from direct rain — are classified as damp locations and must be rated at a minimum of IP44. However, specifying IP65 or higher is typically considered the practical contractor standard. This extra margin is particularly useful for covering situations where driving rain blows at an angle, gutter overflow creates splash zones, or the eave depth is shallower than expected.
For eaves lighting installers working in coastal or high-precipitation markets, specifying IP67 or IP68 fixtures can eliminate callbacks entirely, providing an extra layer of protection against extreme weather conditions.
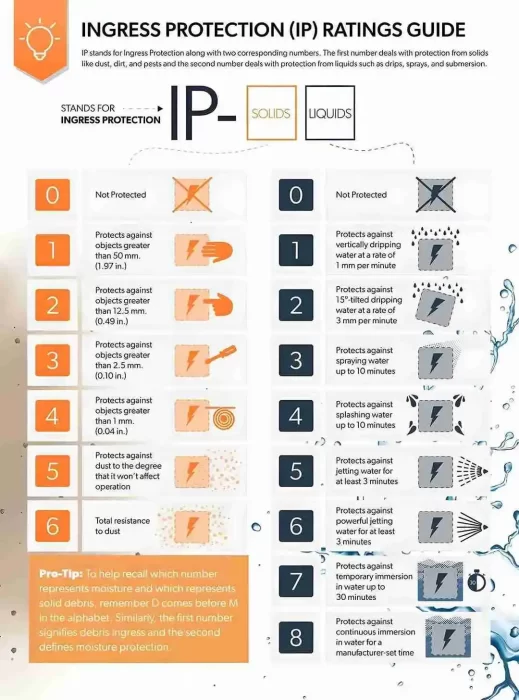
IP Ratings Guide for Outdoor Lighting
Lumen Output and Beam Angle for Under Eave Lighting
For ambient architectural under eave lighting, 250–400 lumens per fixture creates a pleasant wash effect without the flat, overlit appearance of excessive output. Security-focused installations — where the client wants enough light to activate motion-sensing cameras — require 700–1,000 lumens per fixture. Beam angle determines coverage width: a 40–60° angle suits general eave lighting setup, while a narrower 20–30° angle works for accenting specific architectural elements like columns or gable peaks.
Low-Voltage vs. Line-Voltage Systems
Most modern outdoor LED eave lights run on 12V or 24V DC, supplied by a transformer connected to standard 120V AC. For contractors, low-voltage architecture offers two key operational advantages: non-electricians can handle fixture mounting and cable runs, and voltage drop can be effectively managed with proper wire gauge selection. On the other hand, line-voltage systems require licensed electrical work at every connection point, but they eliminate transformer sizing and placement as variables. For wholesale suppliers, understanding which architecture your contractor clients prefer influences which SKUs to stock — low-voltage strip systems and track products sell heavily to landscaping contractors, while recessed soffit fixtures go primarily to general contractors and electrical subs.
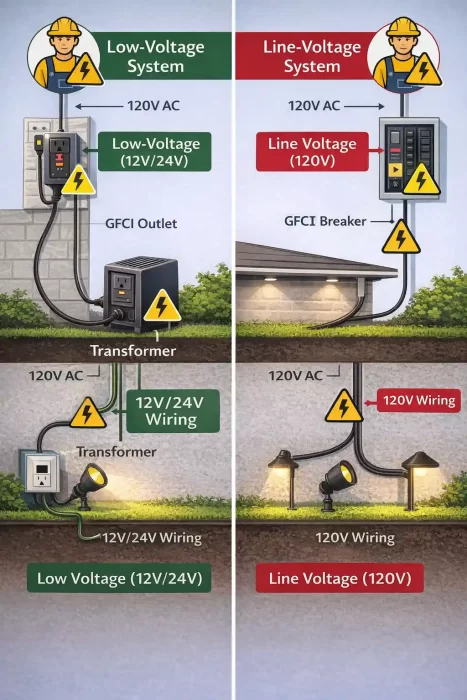
Low-Voltage vs Line-Voltage Lighting Systems
Site Assessment and Planning for Under Eave Lighting Installation
Professional eave lights installation starts at ground level, before a single fixture is touched.
Mapping the Eave Perimeter
Start by walking the full perimeter and marking structural blocking locations. Eave soffits typically consist of thin vinyl, aluminum, or wood panel material, which cannot reliably support screw-mounted fixtures under vibration or thermal expansion. Therefore, fixtures must anchor to blocking, rafter tails, or fascia framing — not to the soffit panel itself. On jobs where blocking isn’t present, contractors either add backing during the installation phase or switch to an adhesive-channel track system designed to distribute load across a longer surface.
Note every downspout, gutter bracket, and HVAC penetration. Shifting fixture locations 12–18 inches to clear these obstacles is far cheaper than drilling through structural components or voiding gutter warranties.
Spacing Calculations for Installing Eave Lights
The 6–8 foot center-to-center spacing rule applies to most residential installations with standard 8–10 foot eave heights. At higher eave heights (12–16 feet), tighter spacing of 5–6 feet compensates for the wider light spread before the beam reaches the ground. Low eaves under 7 feet can use 8–10 foot spacing without creating dark gaps.
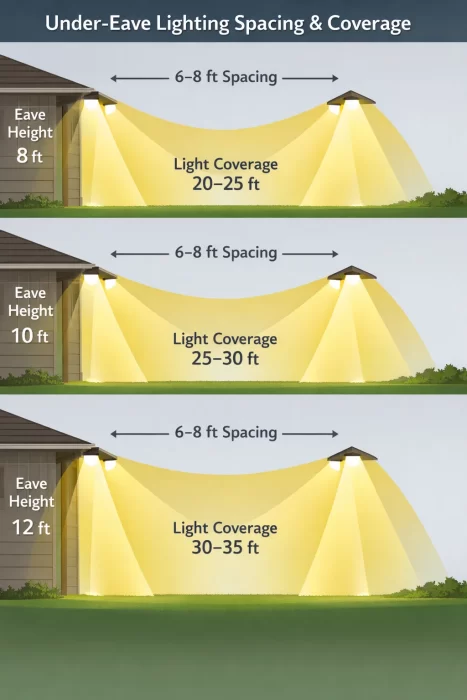
Under Eave Light Spacing and Coverage Chart
At corners and roof valley transitions, plan for a fixture on both sides of the break — even if that places two fixtures closer than the standard interval. A single fixture at a 90° corner leaves a visible shadow seam that clients notice immediately.
Power Source Audit
Locate every existing GFCI-protected outdoor receptacle before committing to a wiring layout. Under NEC 210.8, all outdoor receptacles at dwellings require GFCI protection, and low-voltage transformer inputs plug into these circuits. If receptacles only exist on one side of the building, long cable runs increase voltage drop risk — calculate accordingly or plan for a licensed electrician to add receptacle locations before the lighting installation begins.
For hardwired line-voltage installations, exterior light fixtures in damp locations (under eave positions) must be listed for damp locations per NEC Article 410. Weatherproof boxes and raintight fittings are required at every junction.
Tools and Materials for Under Eave Lighting
A well-staged truck saves 30–40 minutes per job. For installing eaves lights at scale, the core kit includes:
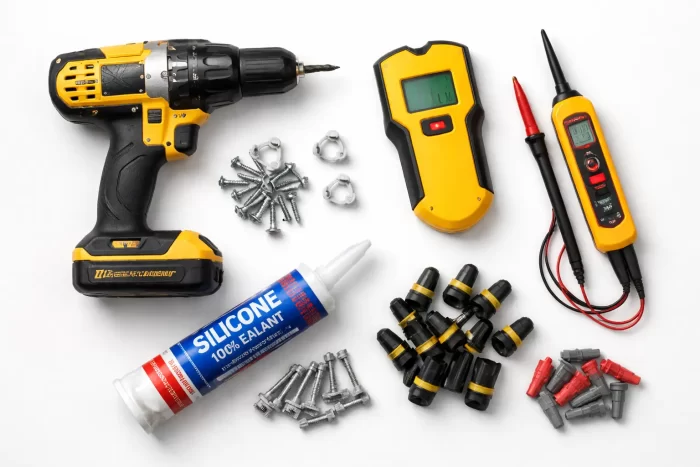
Professional Tools for Under Eave Lighting Setup
Structural tools: Cordless drill/driver with 1/8″ and 3/16″ pilot bit set, stud finder or rafter locator, chalk line, 25-foot tape measure, torpedo level.
Electrical tools: Voltage tester (non-contact), wire stripper, weatherproof wire connectors, UV-rated cable staples or cable clips, conduit if running exposed 120V feeds.
Mounting hardware: Self-tapping exterior screws (stainless or coated), mounting brackets or channel track sections, silicone sealant rated for outdoor use.
Safety equipment: Rated extension ladder with stabilizer, OSHA-compliant ladder safety practices for work above 6 feet, insulated tool handles for any line-voltage work.
For wholesale suppliers building contractor program packages: bundling fixtures with compatible connectors, the correct transformer size for typical run lengths, and pre-cut cable in 25-foot or 50-foot sections reduces job-site improvisation and supports consistent installation quality across your contractor network.
Step-by-Step Under Eave Lighting Installation
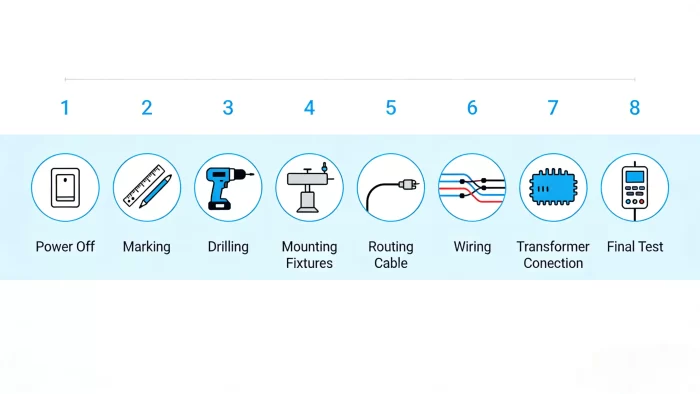
8-Step Under Eave Lighting Installation Process
Step 1: Cut Power and Verify
Before any fixture work begins, turn off the circuit breaker for any existing eave fixtures. Verify dead with a non-contact voltage tester at the junction box. For new installations on a previously unwired eave, this step confirms which circuits already feed to that side of the structure.
Step 2: Mark and Drill Pilot Holes
Transfer spacing marks to the eave soffit or fascia using a chalk line for alignment. Drill pilot holes at each fixture location — sized to the mounting screw, not the fastener shank. On vinyl soffit, oversizing the pilot hole by 1/16″ allows for thermal expansion without cracking the panel.
Step 3: Mount Fixtures to Structural Support
Hold the fixture to the marked location and drive mounting screws into blocking or framing — not soft soffit material. Apply a thin bead of outdoor-rated silicone around the fixture base plate before final torque to seal the penetration against moisture intrusion. For recessed soffit designs, the fixture should sit flush or slightly proud of the panel surface; a protruding gasket lip handles the seal.
Step 4: Route and Protect Cabling
For low-voltage systems, route cable along the eave framing using UV-rated cable clips spaced every 24–30 inches. Cables running vertically down an exterior wall should be seated in surface-mount conduit or cable raceway for physical protection and clean appearance. Avoid running cables through or adjacent to gutter systems — thermal cycling in aluminum gutters causes cable insulation wear over time.
For line-voltage wiring, all connections must occur inside weatherproof boxes, using connectors rated for wet conditions. All conduit entries and exits require listed watertight fittings.
Step 5: Connect Wiring
For low-voltage LED eave lights systems: connect each fixture lead to the main cable run using the manufacturer’s supplied connectors. Confirm polarity matches — reversing polarity on DC LED systems either produces no output or damages driver circuitry depending on the product. Close weatherproof connector caps fully and verify each seat with a firm pull test.
For line-voltage fixtures: match conductor colors (black to black, white to white, bare or green to ground), twist connectors fully, and fold neatly into the weatherproof box before attaching the cover plate.
Step 6: Connect the Transformer or Power Feed
Mount the low-voltage transformer in a ventilated, protected location — under the eave is fine, but positioned away from direct rain splash. Plug into the GFCI-protected outdoor receptacle. For hardwired systems, the electrician makes the panel connection and applies weatherproof fittings at the exterior box.
Step 7: Test and Adjust
Restore power. Walk the eave perimeter and verify every fixture illuminates. Check for dark gaps between fixtures — if a gap is visible at ground level, shift the nearest fixture or add a fill unit. Adjust beam angle on adjustable fixtures before final tightening. On RGB or smart LED eave lights systems, pair controllers and run through the app to confirm addressability and color output before client walkthrough.
How to Install Flood Lights Under Eaves
Installing outdoor flood lights under eaves follows the same structural mounting logic as LED strip or soffit systems, but with additional considerations for heat management and aiming.
Flood fixtures generate more heat than typical LED strip lights — ensure the eave mounting surface has adequate airflow around the driver housing. Aluminum-body fixtures dissipate heat most effectively. Aim the flood head during installation while power is active (where safe to do so), using the client’s intended security coverage zone as the reference. For installing flood lights under eaves near pools or spas, NEC 680.22 applies: luminaires within 5–10 feet horizontally from pool walls require GFCI protection on the circuit.
For motion-activated flood lights, sensor positioning determines detection performance. Aim the PIR sensor toward the primary approach direction — usually perpendicular to a driveway or entry path — not directly downward. Test sensitivity and timer settings before closing out the job.
Christmas Lights Under Eaves Installation
How to install Christmas lights under eaves is one of the most common queries contractors receive in Q3 and Q4. Permanent low-voltage LED channel systems have largely displaced annual clip-and-remove seasonal installations for clients who entertain frequently or want year-round perimeter lighting.
For temporary seasonal installations, the standard hardware is a gutter or eave clip matched to the gutter profile (K-style vs. half-round). Space clips every 12 inches for standard C7/C9 string lights. Route the string from a GFCI-protected outdoor receptacle using an appropriately rated exterior extension cord — not a standard indoor cord. The NEC treats seasonal decorative lighting as temporary wiring, but all receptacles supplying it must still be GFCI-protected.
For permanent holiday-capable systems, contractors should spec individually addressable LED channels with IP65 or higher ratings, installed in the same fashion as architectural under eave lighting. These systems cost $20–$28 per linear foot installed and require a one-time professional installation versus annual reinstallation labor costs — a useful ROI framing for clients who currently hire seasonal installers.
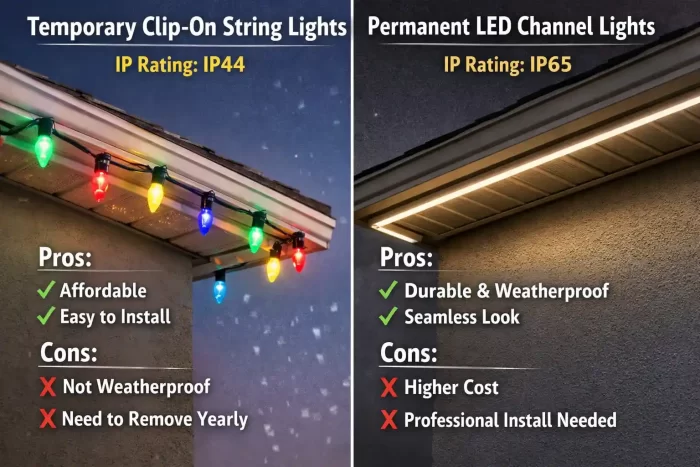
Permanent LED Channel vs Temporary String Lights
Wholesale Supplier Strategies for Eave Lighting Equipment
For wholesale distributors supplying eave lighting installers, a few product and logistics considerations separate high-performing programs from commodity catalogs.
Standardize around two voltage architectures. Most contractor clients will gravitate toward either 12V low-voltage strip/channel systems or line-voltage recessed soffit fixtures. Stocking deep in both categories — with compatible connectors, transformers, and controllers for each system — reduces the number of mixed-brand compatibility calls your sales team handles.
IP65 as the floor, not IP44. Contractors who specify IP44 get callbacks on jobs where eave geometry or wind exposure exceeds the laboratory test conditions. IP65 and above eliminates that risk category. Position it as the professional standard in your contractor materials.
Offer project quantity pricing on cable and connectors. Fixtures get the attention, but cable, connectors, mounting hardware, and transformers are where job-site friction lives. Contractors who can order a full project kit — fixtures plus all materials for installing under eaves — from a single SKU list with volume pricing will route their business to that distributor.
ETL/UL certification matters for commercial projects. Many commercial clients and building inspectors require evidence of listed certification for all components. Stocking ETL- or UL-listed fixtures, particularly for outdoor applications, opens the commercial renovation and multi-unit residential segments that strict DIY-grade products cannot serve.
Frequently Asked Questions
What IP rating do I need for under eave lighting installation?
IP65 is the practical minimum for professional installations. While the NEC requires only damp-location listing for fixtures installed under an eave overhang, IP65 provides additional protection against angled rain, gutter overflow, and high-humidity environments. For coastal or high-rainfall climates, IP67 is the better specification.
Do outdoor eave light fixtures require GFCI protection?
The fixture itself does not require GFCI protection under the NEC — exterior light fixtures permanently wired into the system are not treated the same as receptacles. However, any outdoor receptacle supplying a transformer or plug-connected fixture must be GFCI-protected under NEC 210.8. Always confirm local code requirements, as jurisdictions can impose more stringent requirements than the base NEC.
How far apart should eave lights be spaced for even coverage?
6–8 feet center-to-center works for standard 8–10 foot eave heights. For eaves higher than 12 feet, reduce spacing to 5–6 feet. Place fixtures on both sides of any corner or roof valley transition regardless of spacing interval to prevent shadow seams at architectural breaks.
What tools are needed for installing eaves lights professionally?
Core tools include a cordless drill with pilot bits, voltage tester, UV-rated cable clips, stud finder, chalk line, and weatherproof wire connectors. For line-voltage work, add insulated pliers and a licensed electrician for panel connections. Adhesive track systems eliminate drilling but require surface prep and temperature-appropriate adhesive (many fail below 40°F).
Can under eave lighting be used for Christmas lights installation?
Yes. Permanent low-voltage LED channel systems installed under eaves support programmable holiday display modes through app-based controllers. These systems are installed once and run year-round, replacing annual seasonal clip installations. For temporary Christmas lights under eaves installation, use manufacturer-rated gutter or eave clips and ensure the power source is a GFCI-protected outdoor receptacle.
Well-executed under eave lighting installation comes down to getting the structural, electrical, and product decisions right before the drill comes out. Contractors who standardize their fixture specifications, understand the NEC damp vs. wet location distinction, and source from suppliers with consistent IP ratings and listed certifications will run fewer callbacks and close more referral-based work. For wholesale suppliers, that same knowledge — translated into product selection and contractor support materials — is what builds lasting book-of-business relationships rather than one-time transactions.
Data Sources
- National Electrical Code (NEC) Article 210.8, 410 — Outdoor wiring and fixture requirements
- NEC Article 680.22 — Pool and spa proximity rules for luminaires
- Shinesall.com — Eave Lighting Installation Guide: LED Selection, Fixture Spacing & Wiring Essentials (November 2025)
- Astoria Lighting Co — Outdoor LED Soffit Lighting pricing benchmarks ($20–$28/linear foot installed)
Recommended Internal Link Opportunities
- [LED outdoor flood light selection guide]
- [Low-voltage transformer sizing for outdoor lighting]
- [Wholesale LED fixture catalog for contractors]
- [Christmas lights installation services]
- [Outdoor lighting IP rating guide]